Best & Simplest Crispy Pork Belly

Pailin Chongchitnant • August 14, 2020

Jump to video!


The Many Ways to Make Crispy Pork Belly

If you search the internet, you're going to find A LOT of different ways to make crispy pork belly. How do you know which to follow?? Well, lucky for you I have gone through many of those methods myself in order to actually understand what it is that creates these puffy, crispy skin we long for.

I have discovered that many of the methods that are either not very good, where the skin is crispy but not super puffy and bubbly. Or the skin is crispy but the meat is overcooked. Or it is unnecessarily complicated calling for steps that don't really need to be done at all...I guess many of it is "trim ends off the roast" kind of situation (hope you get my reference!). But most importantly, most of them don't explain WHY they are asking you to do these things, which you know is not my style!

So this recipe has been distilled down to the essentials, along with explanations, so that you only do what is necessary for excellent result. It is also optimized not only for beautiful crispy, puffed skin but also juicy, perfectly cooked meat.

How does Crispy Pork Belly Actually Work?

To get that crispy, golden, bubbly skin, you only need to make sure a few things happen:

  1. You need to poke lots of little holes in it. This breaks the skin integrity and allows it to puff into these gorgeous bubbles. If you don't poke the skin, you will still get crispy skin, but not puffy and bubbly. It is important not to poke holes that are too deep, or meat juices will flow up during roasting, making the skin wet, which interferes with the crisping.
  2. The skin needs to be DRY. You have heard me say this many times, but crispy = no moisture. If something is moist, it by definition cannot also be crispy at the same time. (This is why anything that's crispy-outside-soft-inside can only stay like that for a short time, because the moisture inside will eventually sog out the exterior.) Pork skin has a lot of moisture in it, so we have to make sure it is as dry as possible before we go to crisp the skin. We do this by salting the skin and letting salt draw out some moisture (and also season the skin), and then drying it in the fridge for a day before roasting.
  3. High heat. The skin will become crispy and puffy not when the pork is roasting, but when exposed to a sudden burst of high heat. In Thailand, this is done by deep frying, but we can also achieve the same result by broiling, or even roasting at very high heat.

What To Do With Leftovers?

Try your best to not have leftovers as this is one of those things that do NOT reheat well. The skin will go from crispy to chewy and disappointing. Also, try to serve it while it's fresh for maximum crispiness. Good news is you can roast the pork in advance, let it rest at room temp for up to 4 hours, and about 30-40 minutes before you want to serve it, put it under the broiler to crisp the skin.

Watch The Full Video Tutorial!

All my recipes come with step-by-step video tutorials with extra tips not mentioned in the blog post, so make sure you watch the video below to ensure success - and if you enjoy the show, please consider subscribing to my YouTube channel. Thank you!


Ingredients

Serves 3

  • 500g piece pork belly, centre cut (see vid for explanation)
  • ½ tsp 5-spice powder (I have a recipe for this one the website, or you can buy)
  • ¼ tsp white pepper, ground
  • ¼ tsp salt for the meat, plus another ¼ tsp for the skin

Note: Do not make anymore than you can eat in one meal. This does not keep well and does not reheat well. 

Dipping Sauce

  • 1 Tbsp lime juice
  • 1 Tbsp fish sauce
  • ¾ tsp sugar or light brown sugar
  • ½ tsp roasted chili flakes, or to taste
  • 2 tsp toasted rice powder
  • A little chopped green onions or cilantro (optional)

Instructions

Prepping the Pork:

  1. Using a meat tenderizer, a metal skewer, a thick wooden skewer, or an ice pic, poke as many holes as you can in the pork skin, being careful not to go too deep and puncture the meat.
  2. Use a sharp knife, score the skin into 1-inch strips, going only deep enough to break the skin, try not to cut too much into the fat, and definitely not into the meat.
  3. Turn the pork meat side up, and sprinkle ¼ tsp salt evenly over the meat. Then sprinkle ½ tsp 5-spice powder and rub it evenly into the meat. Finally, sprinkle ¼ tsp ground white pepper and press it in. Be careful not to let any of the spices get onto the skin.
  4. Wash your hands if you've got spices on it, so it won't get on the skin, then turn the pork back skin side up. Sprinkle about ¼ tsp of salt thoroughly over the skin; I prefer using coarser grain salt like kosher salt for this so it's easier to see that you have salted the skin evenly. Let sit for about 20 mins until you see lots of water drawn up out of the skin. Dab it dry, and brush off any remaining grains of salt.
  5. Place pork into a container and refrigerate, UNCOVERED, for at least 18 hours to dry out the skin. (I usually do it for 24, but 18 is the lowest I have personally gone and was still successful. I have seen other recipes say 12, but I have not tried this out myself).

Roasting the Pork

  1. Preheat oven to 350°F or 180°C, set the rack in the middle of the oven. Put pork on a rack so heat can circulate around the meat, then set it on top of foil-lined baking sheet (for easy cleaning).
  2. Roast for 50-60 mins, or until internal temp reaches a minimum of 145F. 50 minutes usually gives you juicy pork that is still beautifully pink inside. If you want well-done pork you will have to roast it for at least 60 minutes for this size, for a minimum temp of 160°F.
  3. TIP: You can take the pork to this stage up to 4 hours in advance, let it sit at room temp, and broil the skin about 40 minutes before ready to serve.

To Crisp The Skin:

  1. Once the pork is done, remove from the oven. If you're going to crisp the skin right away, turn the oven off and open the door for about a minute just to release the heat so the pork doesn't continue to roast while it's crisping the skin.
  2. Set the rack on the lowest or second lowest rung - you want the pork to be about 10 inches away from the broiling element.
  3. Switch to "broil" on high setting.
  4. If there's any fat pooling on the pork skin, dab it dry with paper towel, then broil the pork for 10-20 minutes or until the skin is puffed and bubbly all over. KEEP AN EYE ON IT! There may be hot spots that require you to turn the pork around half way through. Or if the pork is getting too browned on one side you can tent it with foil (sometimes the pork is not even and one side will be closer to the element than the other).
  5. *It's important to keep an eye on it. In my oven, it took 20 mins, in Adam's oven it took only 10 cuz it's smaller and the pork was closer to the element. So it can vary a lot!
  6. Let the pork rest for at least 15 minutes before slicing.

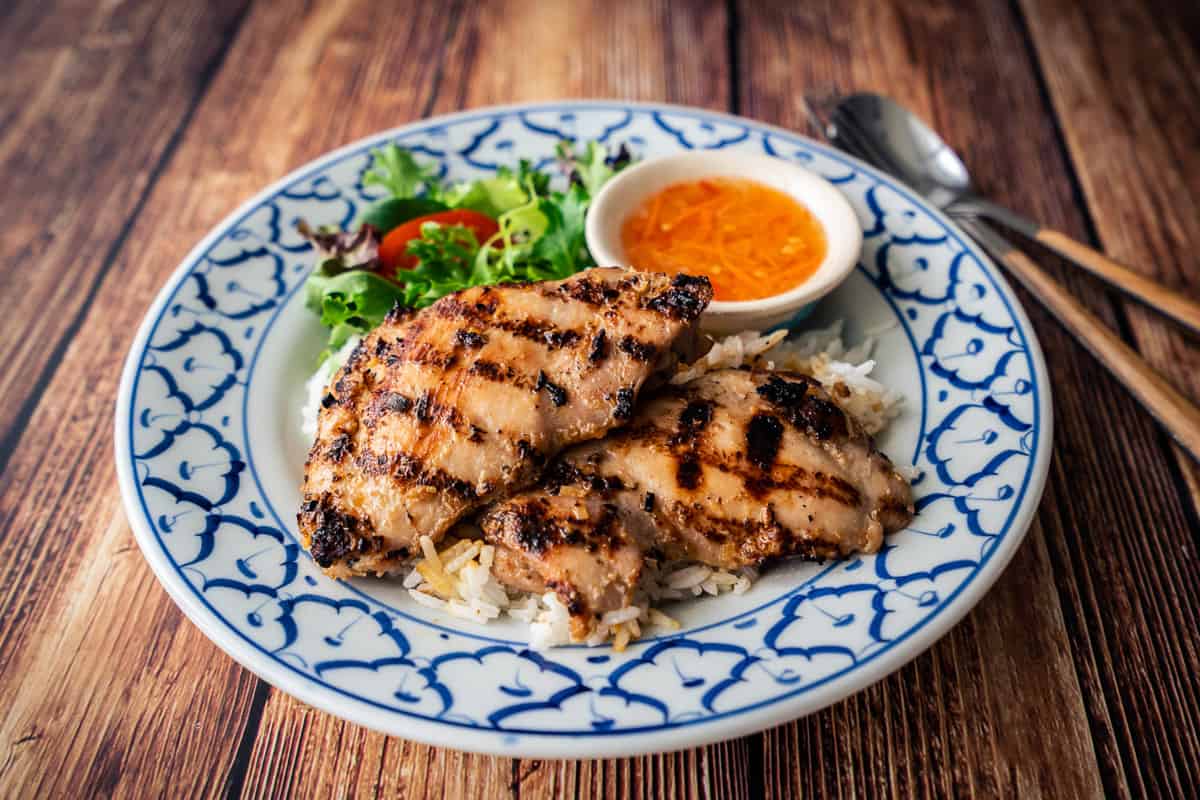
For the dipping sauce:

  1. Combine fish sauce, lime juice, sugar, chili flakes and stir until sugar is dissolved.
  2. When ready to serve, stir in toasted rice powder and green onions or cilantro.

By Pailin Chongchitnant May 7, 2022
Tom yum goong maybe the most famous soup of Thailand, but its milder creamier sister, tom kha gai , is my personal favourite. This comforting Thai coconut chicken soup recipe is infused with the classic Thai herbs: lemongrass, galangal, and makrut (kaffir) lime leaves. It's so easy yet so loveable that when someone asks, "I'm new to Thai food, what should I try/make first?" Tom kha gai is my answer.
By Pailin Chongchitnant May 6, 2022
If you love mangoes, and you love mango desserts, Mango Royale, aka Mango Float, is an absolute must-try; right after mango and sticky rice , of course! It's a frozen Filipino dessert that takes advantage of peak-of-the-season mangoes, and uses only 5 ingredients. There's no baking involved, and it's so easy it's essentially fool-proof!
By Pailin Chongchitnant April 22, 2022
I LOVE all kinds of basil, but I don't love how quickly it goes bad and that it doesn't freeze well. So I came up with this recipe as a way to use up any amount of basil you have on hand . It's an easy and versatile sauce that only uses pantry staples, and can be stored in the fridge for at least a week. Reheat it and pour onto any cooked protein, or use it as a stir fry sauce - or heck, you can even use it as gravy for your mashed potatoes. It can also be made vegan. The possibilities are endless!
By Pailin Chongchitnant April 8, 2022
Imagine this: soft and creamy ice cream bars that you didn't need to whip or churn. All you have to do is cook the ice cream base, pour it into a mold, then cut it into pieces. And it's so soft your teeth will glide right through it as you take a bite, and it's wonderfully chewy. Yes, chewy.
By Pailin Chongchitnant March 25, 2022
I wanted a fried rice recipe that really celebrates the flavours of chilies - not just their heat. This fried rice features not one, not two, but three different types of chilies, combined with the fragrance of Thai basil to tie it all together! And no, it doesn't make this dish overwhelmingly spicy, and you can indeed customize the heat level while still preserving all the delicious chili flavour. It's not something I created out of thin air, but a traditional Thai dish (with a couple of tweaks from me)!
By Pailin Chongchitnant March 8, 2022
If you love cooking Asian food, oyster sauce is probably already in your kitchen. But do you know if the one you have is a "good one”? And is the expensive oyster sauce you bought (or didn't buy) worth the splurge?
By Pailin Chongchitnant March 3, 2022
With over 3 million views on YouTube, this recipe is one of the most popular, and an OG, on Hot Thai Kitchen. This world-famous tom yum soup is universally loved; and with this authentic recipe I promise you can make it as good as, if not better than, the ones in restaurants. It's one of the first dishes I learned to make as a child because it's so easy, making this a great first Thai dish to try!
By Pailin Chongchitnant March 1, 2022
Thai green curry chicken is my most popular recipe on the YouTube channel with over 4 million views . If you want a completely authentic recipe, and one that maximizes deliciousness, this is it right here. It is one of the best known dishes of Thai cuisine, and despite its complex flavours, it is actually quite easy to make at home. It's also gluten free, and adaptable for vegans!
By Pailin Chongchitnant February 21, 2022
Pad see ew is one of the most well-known and well-loved Thai dishes, but most people only know of the more common version of pad see ew that uses fresh wide rice noodles (ho fun). This version however uses thin rice vermicelli, and it's the one that I actually grew up eating in Thailand. It’s an incredibly fast dish to make; from the time I get up to cook to the time I sit down to eat, it takes only 20 minutes! You can even watch me prep and cook it all up in real time in the video tutorial below just to see how fast it really is!
By Pailin Chongchitnant February 7, 2022
Easy, delicious, and versatile; what else could you ask for in a chicken recipe? Lemongrass chicken is a staple menu item in Vietnamese restaurants in Canada, and one that my husband gets all the time - which is why I was inspired to recreate it. It is so quick to prepare, kid-friendly, can last you the whole week in the fridge (yay meal prep), and you can grill or broil it!
More Posts
Share by: