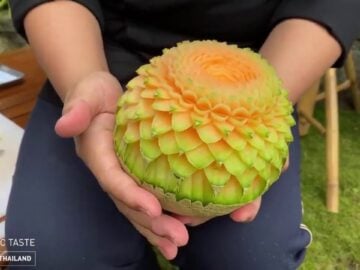
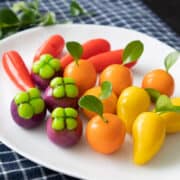
Edible Mini Fruit Sculptures ลูกชุบ (look choop)
These too-pretty-to-eat fruit sculptures are traditional Thai sweet treats made from mung beans and coconut milk, and glazed in shiny agar agar jelly. Creamy, sweet, and coconutty, these are the perfect afternoon sweets with a hot cup of tea. They also make great gifts, and are vegan and gluten free much like many other Thai desserts.
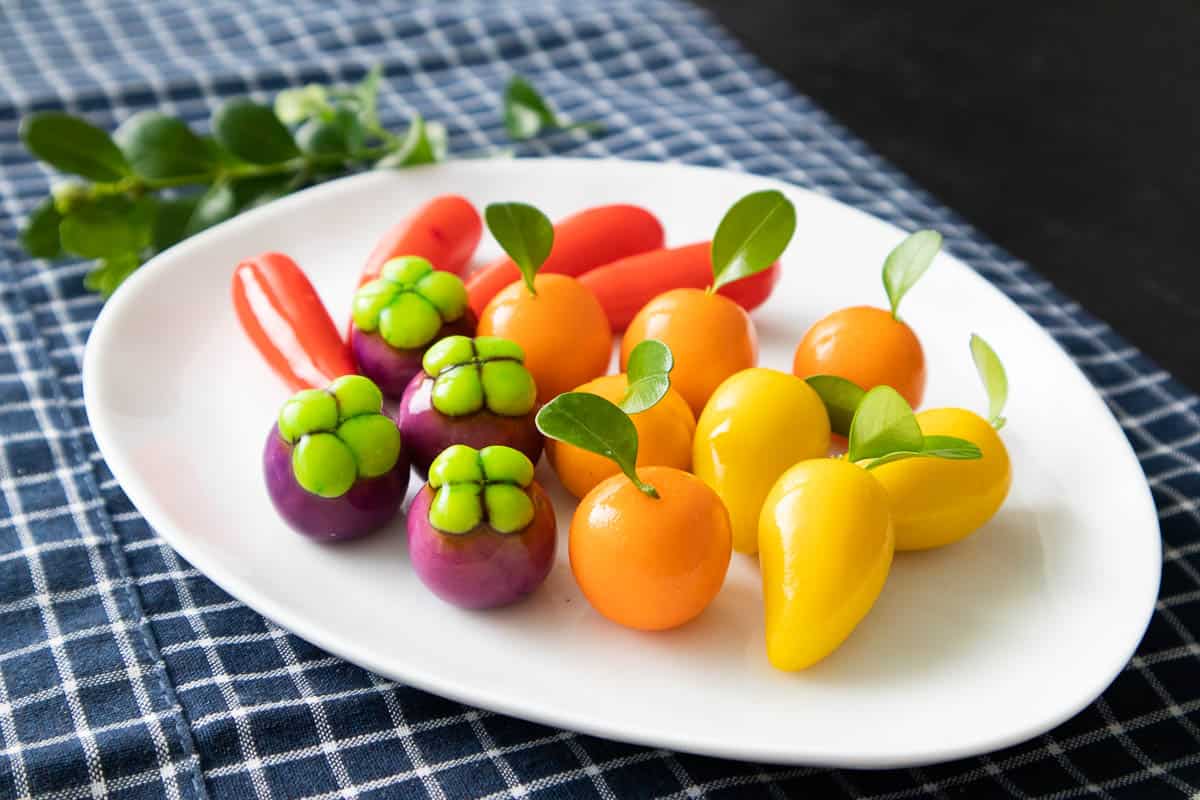
Not gonna lie these are a LOT of work, but the end result is so rewarding, and it can be a fun family activity if you've got kids! You can also get creative and turn them into whatever shapes you like. I remember making simple geometric shapes as a kid when I made them with my mom, and delighting in the fact that I made "unique" look choop!
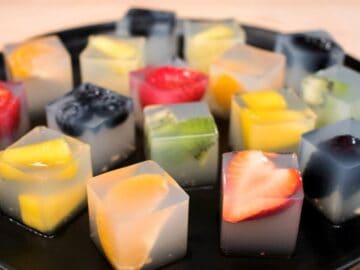
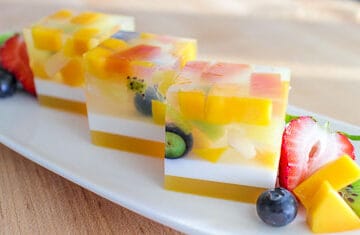
Want beautiful Thai fruit desserts but don't want to spend a lot of time? Check out my coconut water fruit jelly cubes or my "viral" agar jelly fruit cake!
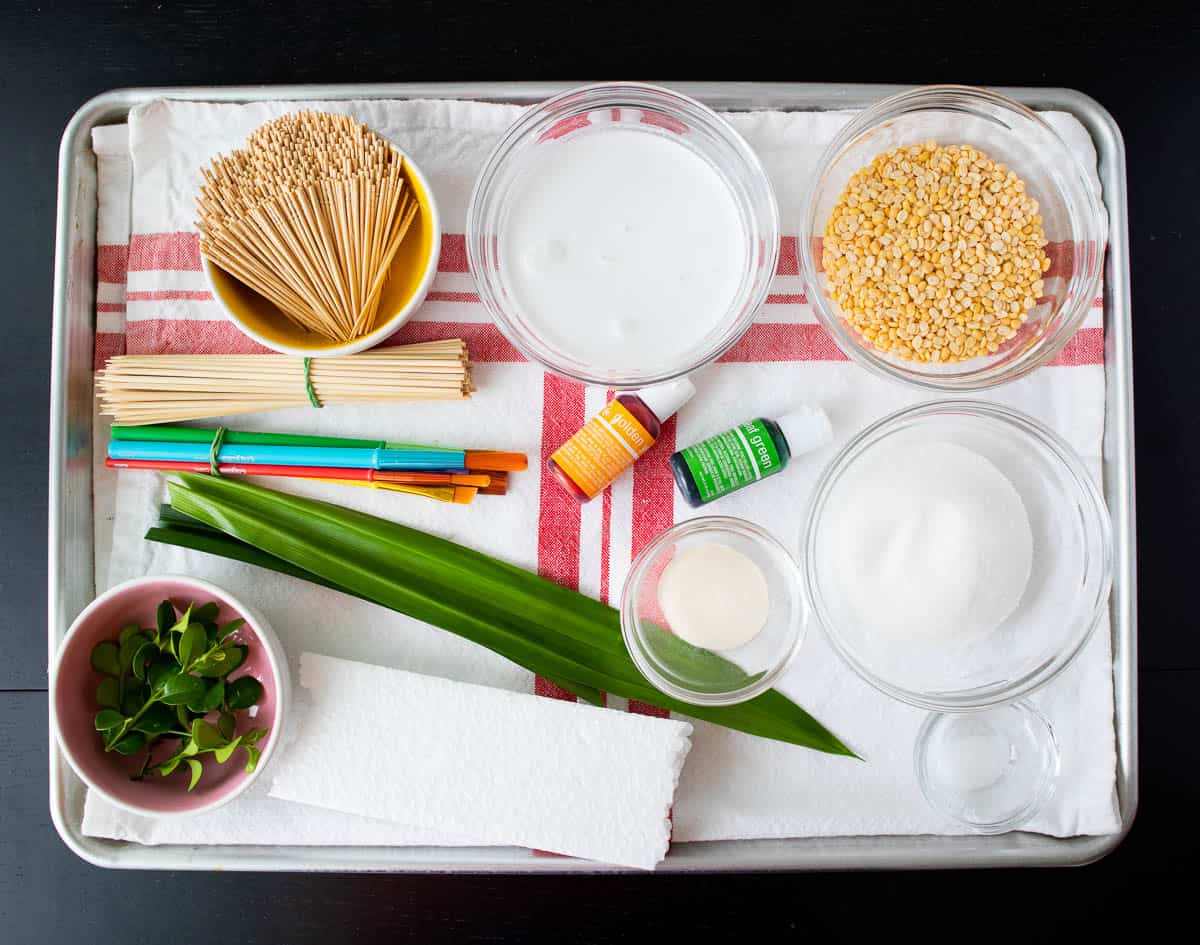
What You'll Need
Here are the ingredients and equipment you'll need to make look choop. Please see below for substitutions.
Step-By-Step
Equipment Notes
Skewers or toothpicks? Toothpicks are fine, but personally I find skewers easier to work with because it's just easier to maneuver with more room for your hand. I also find the fruits are less likely to slide down a skewer compared to very thin toothpicks.
But stick with the smallest skewers you can find so as to not create giant holes in the fruit. Also if the skewers are longer than 6 inches, cut them down so they are less likely to tip over.
Styrofoam or cucumber? You will need something to hold the skewers up as you paint and glaze the look choop. If you've got styrofoam lying around from delivery packaging, great; if they're thin pieces you can stack them so they're at least 1.5 inches thick for more stability. Otherwise you can use a firm vegetable like cucumber, daikon radish or zucchini, halved lengthwise and placed cut side down.
Paint brushes. If you are making fruits that have multiple colours, use clean paint brushes (that have never been used with actual paint). No need to go to an art supplies store; drug stores (in N. America) usually sell cheap paint brushes next to crayons and other kids craft supplies.
How to Steam the Mung Beans Instead of Boiling
A more traditional way to cook mung beans for look choop is to steam them, which offers the benefit of having no excess water to evaporate, thus reducing the active cooking time.
The downside is you have to soak the beans in advance, which is why I prefer boiling. You also won't have an opportunity to infuse the pandan leaves if you're using them, but that's a really minor point.
Here's how to steam the beans:
- Wash the beans till the water is no longer yellow or foamy, then soak the beans for at least 3 hours or overnight.
- Line your steamer basket with muslin or a double layer of cheesecloth. Place the drained beans in the steamer basket and clear a hole in the middle, making a doughnut shape with the beans, to allow steam to come up and cook them more quickly and evenly. Fold the edges of the cloth over the beans and steam on high heat for 30 minutes or until the beans are very easily mushed between your fingers.
After this you would just add them to the blender along with the coconut milk, sugar and salt and proceed with the recipe as written.
FAQ About Ingredients
You must use shelled mung beans for a light colour. Whole mung beans are green, and your look choop would end up looking...well...awful. However, shelled mung beans are available split or whole, and you can use either one of those.
It is normal...but that's not the colour of the beans. If your washing water turns bright yellow, it means that the beans have yellow food colouring added to them so they would look better on store shelves. The beans are still perfectly fine to use, but you'll want to wash them a few times until your water is no longer yellow.
Theoretically, yes, as long as they are light in colour. It's not done in Thailand, but in other countries, there are similar bean paste treats using white beans. The flavour will obviously differ but you can certainly try it out.
That's a big NO. Gelatin does not set at room temperature, so they will simply not work here, and even if you managed to figure out how to make it work, you'd then need to serve these cold which is not a good serving temp for the bean paste. I don't know of another ingredient that might work in this particular application. For more information on agar agar check out my video on Agar Agar FAQ.
Theoretically, yes. But practically, if you're making many different fruits and using many different colours, it's gonna be much easier to paint them. Painting/dipping them also requires much less colour as you only need to colour the exterior.
If not serving within the day of making them, I would keep them in the fridge in an airtight container to prevent drying. In the fridge they will be good to eat for a few days, but will eventually dry out.
Tip: Keep different colours separate as they will bleed into each other over time if they touch. If possible, allow them to come to room temp before serving.
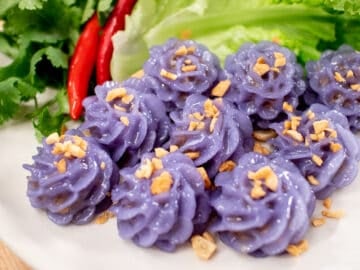
Other Beautiful Treats You Might Like:
Edible Mini Fruit Sculptures
Equipment
- Blender
- Toothpicks or small skewers (see note)
- Paint brush (only needed if making multi-colour fruits)
- Styrofoam or hard vegetables like a cucumber halved lengthwise for holding up the skewers
Ingredients
For the Mung Bean Paste
- ½ cup dried shelled mung beans
- 2 cups water
- ⅓ cup sugar
- ½ cups coconut milk
- ⅛ tsp salt
- 1 pandan leaf optional
For the Coating
- 1 Tbsp agar agar powder
- 1 ½ cups water
For Decorating
- Food colouring
- Small leaves
Instructions
MAKING DOUGH:
- Rinse mung beans in cold water. If the rinsing water is yellow this is due to added food colouring; keep rinsing until the colour is gone.
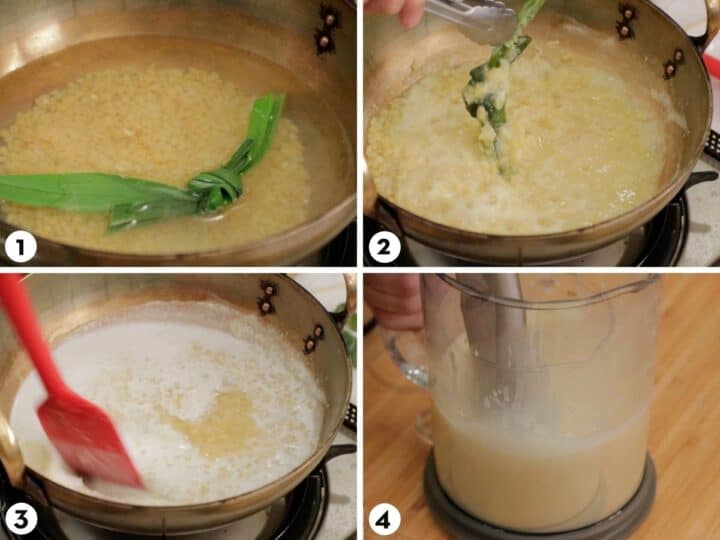
- Add the beans and pandan leaf (if using) into a medium sized pot and add 2 cups of water. Bring to a boil, then turn the heat down to medium and simmer for 20-25 minutes until the beans are fully cooked and mushy. If the water dries up before the beans are cooked, add only a little bit more water at a time; you want as little excess water as possible when the beans are done. (Note: See post above if you want to steam rather than boil.)
- Once the beans are fully cooked, remove the pandan leaf if you used it, and if at this point there is a lot of water left, keep cooking and stirring until it looks like thick porridge.
- Add the coconut milk, sugar, and salt, and stir until the sugar is dissolved. Transfer to a blender and blend until completely smooth.
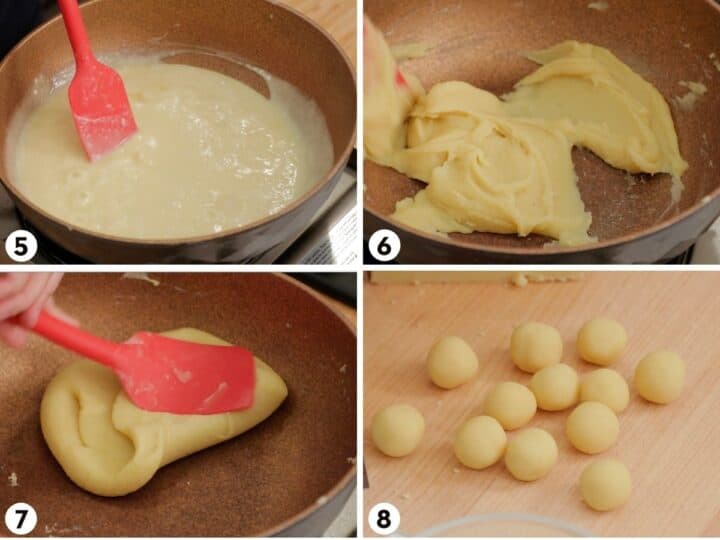
- Pour the bean “smoothie” into a large skillet or wok, preferably non-stick, but stainless steel will do. (Do not use a seasoned carbon steel or cast iron pan as we do not want any of the seasoning oil or smoky flavour in the paste.)
- Cook the bean mixture over medium low heat, stirring constantly with a rubber spatula, until it looks like dough and no longer sticks to the spatula. Reduce the heat to low once the mixture starts to look like a paste. Once the dough no longer sticks to the spatula, keep stirring for another 5 minutes to further dry out the dough. This step will take at least 20 minutes for this amount.
- Transfer the bean paste into a bowl, cover and allow to cool completely. *From this point on everything that touches the dough needs to be very clean because we are not cooking it further.
SHAPING:
- With very clean hands, knead the dough a bit to even out the texture and keep the dough covered if you're not working with it to prevent drying out.
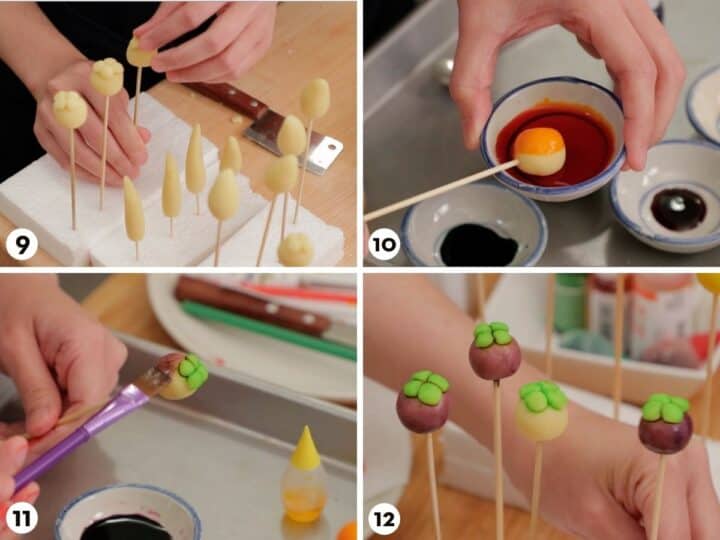
- Test the dough consistency by making a few shapes with it, poke the dull side of the skewer or toothpick into the non-presentation side of the "fruit", going halfway through, then stick the skewer into the foam or vegetable. If you can make smooth shapes without any cracks, and the fruits stay on the skewer without sliding down, you're good to go. If the fruits are sliding down, the dough is too moist and you will need to cook the dough more to dry it out (this is a pain, so err on the side of dough being too dry). If the fruits are cracking, the dough is too dry; sprinkle the dough with more water little by little, and knead it in until you can form smooth shapes.
- Once you're ready to go, cut the dough into pieces, about 7-8 grams each, then roll them into balls. Each ball should be no bigger than ¾ inch in diameter. Keep the balls covered with a tea towel to prevent them from drying out.
- Shape each ball into whatever fruit shape you are making, I recommend starting with the lightest coloured fruits first. Poke the non-presentation side of the fruit with the dull side of a toothpick or skewer, going halfway up the fruit. For some fruits, such as the magosteen and orange, the non-presentation side is the bottom; for others, like the mangoes and chilies, it'll be the "stem" side. Stick the skewer into the styrofoam or vegetable to stand it up. Repeat with the remaining dough. *If the fruits are cracking AFTER you've formed them, you're leaving them out too long and they are drying out. Make sure there is no draft where you're working, and you may need to do them in smaller batches and move on to the colouring step quickly to prevent the formed fruits from drying out.
COLOURING:
- Put food colouring you're going to use in small but wide bowls (dipping sauce bowls are great for this). Add water to the colour to achieve the desired colour intensity; the amount of water depends on the colour, the type, and the brand of the food colouring, so you will need to experiment. Gel-based colours will a need more water, but water-based colours do not need as much, or none at all for lighter shades like yellow. Err on the side of adding too-little water as you can always add more if the colour is too intense.
- Starting with the lightest colour fruits, "roll" the fruits in the colour (dip them sideways and spin the skewer to coat all sides), or paint them with a clean paint brush if the fruits have 2 or more colours. If you are dipping, gently dab the bottom with paper towel afterward to absorb excess colour and then put them back on the styrofoam. *Do not let them hang out for too long after painting, as they are still unglazed and can dry out and crack.
GLAZING:
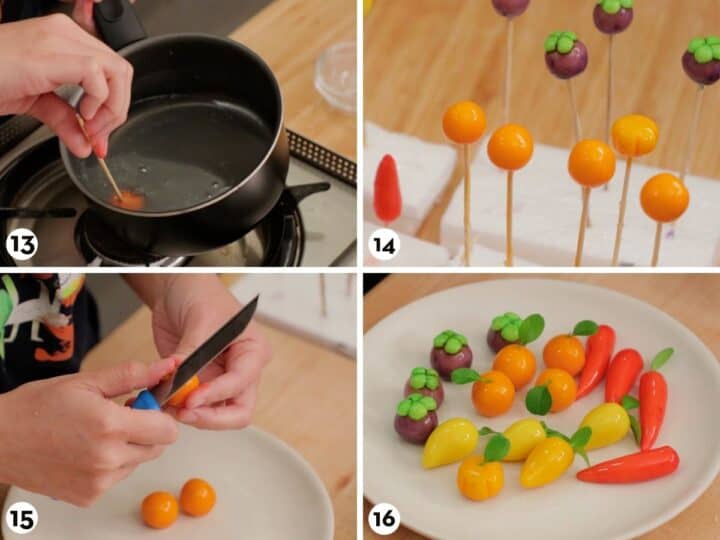
- While the paint dries, make the agar agar solution for the coating. Add the agar agar powder and cold water to a small pot. Bring to a full boil over high heat, stirring constantly until it is dissolved. Turn off the heat and check that there are no longer any specks of agar. Allow to cool for a few minutes before using.
- Before dipping, scoop off any bubbles or foam on the surface. Starting with the first fruits you coloured, dip them into the agar agar and quickly tip it upward, allowing the excess to drip down the skewer. Rest the fruit back on the styrofoam while you finish the rest. *If the paint is leaching into the agar solution, it needs to dry longer. This is why we start with the lightest colour; so any colour contamination in the glaze will not be as visible on darker fruits.
- Once you're done with the first layer of glaze, repeat until you have 3-5 layers. The glaze should dry within just a minute or so as agar agar sets at room temp. After 3 layers, taste one and see if you’re happy with the thickness of the glaze. You can always keep going as needed. *If the agar agar is getting too cool it will become clumpy and the coating will be uneven; simply reheat to thin it out.
FINAL TOUCHES:
- Once the final coat is done and dry, remove the skewers and use small scissors or a paring knife to remove the “tail” from the bottom. Decorate the top with some leaves if you wish, and they’re ready to eat!
- Storage : They can be left out at room temp for several hours, but if keeping beyond the day, wrap them tightly and refrigerate. Put the same colours next to each other as the colours will bleed into one another over time. These will last a few days in the fridge.
Video
Notes
Nutrition
The post Edible Mini Fruit Sculptures ลูกชุบ (look choop) appeared first on Hot Thai Kitchen.