Agar Jelly Fruit Cake เค้กวุ้นผลไม้

Pailin Chongchitnant • June 2, 2017

Jump to video!


This ain't your mama's "fruit cake"! This light and refreshing beauty is an absolute showstopper, and nothing says "summer treats" more than these gorgeous cubes of fruit-embedded jelly. The coconut layer adds an extra tropical flare! The fruit combination I used: mango, papaya, pineapple, lychee, kiwi and blueberries, is a winning combination, but you can really be creative with it. You can have colour themes for your cake too: red, purples, oranges...

BEFORE YOU MAKE THIS RECIP E...

Please do yourself a favour, watch this "Recipe Footnote" video before you make this. It will tackle common problems people have, one of which might actually ruin the recipe if you're not aware of it.

Trust me, I've received many many questions about agar jelly desserts over the years, and without fail, people who come to me would've not had these issues had they watched the footnote video. It seems like a simple dessert but there are a few tricks that you need to know to ensure you will not fail!

Watch The Full Video Tutorial!

All my recipes come with step-by-step video tutorials with extra tips not mentioned in the blog post, so make sure you watch the video to ensure success. If you enjoy them, consider subscribing to the YouTube Channel to not miss an episode. Thank you!

If you prefer, you can also watch the video on YouTube .


This beautiful, no bake dessert is light, healthy filled with fresh fruit—perfect for the summer. Agar jelly is also vegan friendly! #vegan #dessert #nobake #healthy #fruit #agar #jelly

Agar Jelly Fruit Cake เค้กวุ้นผลไม้


Description

Please watch this "Recipe Footnote" video before making to ensure you will succeed with this recipe. There are a few important tips you will need to know!


Ingredients

Fruit Layer

  • 1 ⅓   cups water
  • ⅔ cup juice from canned lychee (and keep the fruit for the cake itself)
  • ¼ cup sugar
  • 1¾ tsp agar agar powder (buy it online)
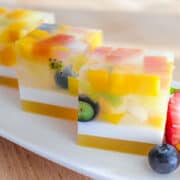
  • ~2 cups small fruit pieces of your choice(I used mango, pineapple, red papaya, lychee, kiwi and blueberries)

Coconut Layer

  • ¾ cup coconut milk
  • ¼ cup water
  • ¾ tsp + ⅛ tsp agar agar powder
  • 3 Tbsp sugar
  • A pinch of salt
  • ~4 inches pandan leaf, optional

 Bottom Juice Layer

  • ¾ cup juice of your choice (I used mango juice to match the colour and flavour of my fruit pieces. If your juice isn’t thick like mine, you can use 1 cup of juice and no water)
  • ¼ cup water
  • ¾ tsp + ⅛ tsp agar agar powder
  • Sugar to adjust flavour if needed

Shop Ingredients & Kitchen Tools I Use


Instructions

Before you start, make sure you have all your fruit cut and ready to go.

Make the fruit layer:

  1. In a small pot add COLD water, lychee juice, agar agar powder, and whisk until there are no more lumps. Once mixed, turn on the heat and bring to a full boil, stirring constantly.
  2. Once boiling, let it boil for a minute or so, or until agar agar powder is completely dissolved. To check, scoop some liquid into a spoon, pour it off, then closely inspect the spoon to see if there are any specks of agar agar stuck to the spoon or not. If not, you're good to move on.
  3. Add sugar and stir until dissolved, then remove from heat and immediately pour about ¼-inch of the agar agar into your mold. Working quickly, place fruit pieces in the mold, making sure you evenly distribute all the different colours. Once you've added all the fruits, pour the rest of the liquid gently over them.
  4. Let this layer sit for several minutes or until the top is firm enough to pour on the second layer.

While you wait for the fruit layer to set, make the coconut layer:

  1. In a small pot, combined coconut milk, water, agar agar powder, and stir to dissolve the powder.
  2. Add the pandan leaf, if using, then turn on the heat to medium high and bring to a boil, stirring constantly.
  3. Once boiling, let it boil for a minute or so, or just until the agar agar is completely dissolved (do the same check as above).
  4. Add sugar and a pinch of salt and stir to dissolve. Remove the pandan leaf.
  5. Your bottom layer should be firm enough by this point, but check by gently touching it and see if the top is set and dry; it is okay if it is still soft in the centre. If it is ready, GENTLY pour the  hot coconut layer on top of it. If the bottom layer is still quite soft, pour the coconut layer onto the back of a spoon and let it drizzle gently onto the bottom layer.

While you wait for the coconut layer to set, make the bottom juice layer:

  1. Combine all ingredients in a small pot and stir to mix the powder. Turn the heat on to medium and bring to a boil, stirring constantly, just until the powder has completely dissolved. DO NOT OVER COOK THIS MIXTURE, SEE NOTE BELOW.
  2. Make sure the coconut layer has set enough, and pour the hot juice layer over it.
  3. Refrigerate for a couple of hours until cold.
  4. If you want to unmold the whole thing in one piece, it can be a bit of a challenge, but see the video for my technique OR check out my Coffee and Cream Agar Jelly for a new technique I came up with!

Join us on Patreon and Get Bonus Content & Rewards


Notes

When working with acidic liquids such as fruit juices, DO NOT simmer the liquid any longer than necessary. Simmering agar agar in an acidic liquid for a long time will break it down and it will not set. Simmer it just long enough to dissolve the powder and use it immediately. Trust me, I learned the hard way! 

By Pailin Chongchitnant May 7, 2022
Tom yum goong maybe the most famous soup of Thailand, but its milder creamier sister, tom kha gai , is my personal favourite. This comforting Thai coconut chicken soup recipe is infused with the classic Thai herbs: lemongrass, galangal, and makrut (kaffir) lime leaves. It's so easy yet so loveable that when someone asks, "I'm new to Thai food, what should I try/make first?" Tom kha gai is my answer.
By Pailin Chongchitnant May 6, 2022
If you love mangoes, and you love mango desserts, Mango Royale, aka Mango Float, is an absolute must-try; right after mango and sticky rice , of course! It's a frozen Filipino dessert that takes advantage of peak-of-the-season mangoes, and uses only 5 ingredients. There's no baking involved, and it's so easy it's essentially fool-proof!
By Pailin Chongchitnant April 22, 2022
I LOVE all kinds of basil, but I don't love how quickly it goes bad and that it doesn't freeze well. So I came up with this recipe as a way to use up any amount of basil you have on hand . It's an easy and versatile sauce that only uses pantry staples, and can be stored in the fridge for at least a week. Reheat it and pour onto any cooked protein, or use it as a stir fry sauce - or heck, you can even use it as gravy for your mashed potatoes. It can also be made vegan. The possibilities are endless!
By Pailin Chongchitnant April 8, 2022
Imagine this: soft and creamy ice cream bars that you didn't need to whip or churn. All you have to do is cook the ice cream base, pour it into a mold, then cut it into pieces. And it's so soft your teeth will glide right through it as you take a bite, and it's wonderfully chewy. Yes, chewy.
By Pailin Chongchitnant March 25, 2022
I wanted a fried rice recipe that really celebrates the flavours of chilies - not just their heat. This fried rice features not one, not two, but three different types of chilies, combined with the fragrance of Thai basil to tie it all together! And no, it doesn't make this dish overwhelmingly spicy, and you can indeed customize the heat level while still preserving all the delicious chili flavour. It's not something I created out of thin air, but a traditional Thai dish (with a couple of tweaks from me)!
By Pailin Chongchitnant March 8, 2022
If you love cooking Asian food, oyster sauce is probably already in your kitchen. But do you know if the one you have is a "good one”? And is the expensive oyster sauce you bought (or didn't buy) worth the splurge?
By Pailin Chongchitnant March 3, 2022
With over 3 million views on YouTube, this recipe is one of the most popular, and an OG, on Hot Thai Kitchen. This world-famous tom yum soup is universally loved; and with this authentic recipe I promise you can make it as good as, if not better than, the ones in restaurants. It's one of the first dishes I learned to make as a child because it's so easy, making this a great first Thai dish to try!
By Pailin Chongchitnant March 1, 2022
Thai green curry chicken is my most popular recipe on the YouTube channel with over 4 million views . If you want a completely authentic recipe, and one that maximizes deliciousness, this is it right here. It is one of the best known dishes of Thai cuisine, and despite its complex flavours, it is actually quite easy to make at home. It's also gluten free, and adaptable for vegans!
By Pailin Chongchitnant February 21, 2022
Pad see ew is one of the most well-known and well-loved Thai dishes, but most people only know of the more common version of pad see ew that uses fresh wide rice noodles (ho fun). This version however uses thin rice vermicelli, and it's the one that I actually grew up eating in Thailand. It’s an incredibly fast dish to make; from the time I get up to cook to the time I sit down to eat, it takes only 20 minutes! You can even watch me prep and cook it all up in real time in the video tutorial below just to see how fast it really is!
By Pailin Chongchitnant February 7, 2022
Easy, delicious, and versatile; what else could you ask for in a chicken recipe? Lemongrass chicken is a staple menu item in Vietnamese restaurants in Canada, and one that my husband gets all the time - which is why I was inspired to recreate it. It is so quick to prepare, kid-friendly, can last you the whole week in the fridge (yay meal prep), and you can grill or broil it!
More Posts
Share by: